|
Suspension Setup
I compiled all of the info on this page from some web searching and from experts like Laz at GT Thunder, Tyler (KillerQuad, MSI Racing), Rudy at DFR, and Jim at Motowoz. I am not an expert at all. I just try to make adjustments based on what the experts tell me. Motowoz and GT Thunder have been a great help to me. They stick by their products and they are very knowledgeable.
Here is a nice image that shows how to setup the camber, it was posted on a forum.
The ATVriders.com alignment page.
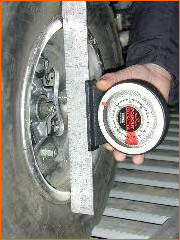
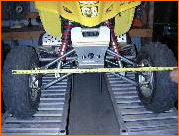
Prior to doing any setup you need to set your tire pressures to whatever you race with and find a nice flat surface. To set the toe I use a collapsable aluminum straight edge from home depot. To set camber I use a digital level, a regular angle finder works fine too. You will also need a tape measure.
Recommended ATV suspension alignment settings (Primarily XC desert racing):
Setup your suspension in this order: Ride height, Caster, Camber, Toe. If you are setting up a brand new suspension and things are way off; first get the tow in the ballpark, then do the ride height, caster, camber, and final toe.
Ride Height: 1/4-1/2" higher in the front than the rear.
Caster shims (JD Performance A-arms) in the front for desert / in the back for MX. 4-7 degrees caster for MX, 7-10 for Desert.
1/4” toe in
1-2 degrees negative camber
Ride Height: Setting the ride height is very important and often overlooked. You need the front of the quad to be slightly higher than the rear in order for it to handle correctly. Ride height is measured with the racer on the quad in the racing position. Then have someone measure the distance from the ground to the bottom of the footpeg. Then take the same measurement at the frame, just behind the a-arm (approximately 22" in front of the footpeg) First get the rear height where you want it, I normally set the rear ride height with the preload on the rear spring wherever the shock tuner/manufacturer recommends. Then I setup the front around that. For instance your ride height at the footpeg it is 7.25" and 22" forward of that it is 7.50" (this is probably an MX type ride height) The ride height on my desert racing quad is 9" at the peg.
You can set the ride height anywhere you want, just be sure your front measurement is 1/4 - 1/2" higher than the measurement at the foot peg.
When setting up sag and ride height on new shocks or a new setup I setup the rear shock pre load according to whatever the shock builder recommends. Then I check the height at the peg and at the front of the frame then I setup the pre load on the front shocks in order to get the ride height correct.
Rebound: Rudy taught me this trick for checking rebound in the rear. Push the quad all the way down using the rear bumper, then pull it up hard. The rear tires should come off the ground towards the end of the shock travel, prior to the shock being fully extended and the tires simply being pulled up by the shock. If the tires are just being pulled up by the shock the rebound is too slow. Adjust it clockwise to speed it up a bit.
Rear Sag: The following sag information is from Tyler at MSI Racing:
3-5" of rear sag is a good starting point. "For your SAG measurment you will need to mark a spot on your axle and then another spot STRAIGHT up on your sub frame and measure the difference from fully extended rear end with tires off the ground and then measure again with you standing on the pegs. If your ride height is where you want it but your SAG is WAY too much then you will need to go with a HEAVIER Rear Spring and take some pre load out of it to then get your ride height back down to where you want it to be...then check that SAG again. This is also a VISE VERSA Deal as well... I Recently went from a 375 main spring on my rear to a 425 and my new set up is softer than it has ever been yet has more bottoming resistance than ever as well Your rebound will need to be adjusted to this as that heavy spring will try to push the roubound valving to its max and you may even need to get the shock revalved ... I luckily did not have to, but just BARELY."
Rear GT Thunder shock settings. These are some recommended settings I got from Tyler for GT Thunder's new updated high flow piston shocks, it works well for me:
Run your Compression all the way to the softest position on the rear and front shocks ... open them babies up .... on the rear, leave the pre load nuts where LAZ set them (3 turns) .... and on the rear set your rebound all the way SLOW .... then on the rear compression go 3 clicks harder and on the rear rebound go 3 clicks faster." Remember there are no magic numbers for compression, rebound and sag settings. They will vary wildly from rider to rider and setup to setup. So mess around and find what works best for you.
Measuring Wheel Travel
You can use this method to measure your total front and rear wheel travel to brag to your friends I guess.
1. Remove shock from quad and measure the length of your shock from eye to eye this is the extended shock length.
2. Measure the length of the shock shaft with the shock fully extended. You can measure down to the spring perch and then subtract by 3/8" because the bump stop will smash down to 3/8" and it will prevent the shock from traveling all the way down to the spring perch.
3. Subtract this number from the extended length, this will give you the compressed shock length.
4. Get the quad off of the ground and level, remove the shock. I use a stack of tires under the belly skid plate.
5. Move the a-arms so that the eye to eye measurement is equal to the extended length of your shock. Measure the distance from the ground to the bottom of your tire, we will call this tire measurement 1.
6. Move the a-arms up so that the eye to eye measurement is equal to your compressed length. Measure the distance from the ground to the bottom of your tire again, we will call this tire measurement 2.
7. Subtract tire measurement 1 from 2 this is your total wheel travel: tire measurement 1 - tire measurement 2 = wheel travel.
8. Repeat these steps for the rear shock. You will need a friend to lift the rear of the quad while you measure the eye to eye lengths and the tire measurements.
On my friends 2006 Raptor 700 with Lonestar Racing DC-4 arms with PEP shocks front and rear we came up with 8" rear travel and 11.25" front travel.
Stock Honda 450R Shock settings
If you have stock shocks this setup seems to help the quad ride a lot nicer. Take all of the preload off the spring (thread the spring adjuster all the way up).
Adjust the compression (the top adjuster screw on the shock) to full soft (counter clockwise)
Adjust the rebound (the bottom adjuster screw on the shock) to full hard (clockwise)
This is a decent starting point. Adjust the rebound and compression from here as you see fit. You will likely need to add a turn or two of compression if you hit a lot of jumps.
Also a very overlooked setting is your tire pressure. Run the recommended tire pressure. Too much or too little will make the quad ride and handle like crap. On stock tires I used to run 5psi rear and 4.5psi front.
A-arm Install page from JD Performance
Suspension Setup "how to" that I found on the web:
Put the quad on a level surface. Do not try to do this on a jack or stand. You will need a straight edge and an angle finder. The first thing to set is camber. Camber is the amount of degrees that the tire tilts out or in from the bottom of the tire. You have negative camber if the tire is tilted in at the top. You will want to set this depending on the type of riding that you do. For motocross you will want as much as 4.5 degrees of negative camber. The typical recreational rider is okay with between 0 and 3 degrees of negative camber. He also explained the caster is preset due to the way the A-arms are made. Next, try to adjust the ball joints by eye. Twist the ball joints in or out trying to a line the wheels the best you can. Now, use your angle finder and straight edge to measure the angle. If you need to adjust your camber, you will have to remove the upper ball joint and thread it in or out. Reconnect and measure again. When you have the camber set you can tighten up your ball joints and install the cotter keys. Also, tighten the jam nut on the a-arm and don't forget to grease the new a-arms. With camber set, you should proceed to set your toe. Toe is the relationship between the front of the tire and the rear of the tire, as with toe-in or toe-out.
Tip: make sure to center up the screw thread on the tie-rod ends. You may need to adjust them in or out so it is important to give yourself room to thread in or out. Toe-in is when the front of the tire points in more than the rear. You should set your toe by giving a slight toe-in. Usually toe-in to 1/8" this will help when turning your ATV. The process is quite easy. Adjust your tie rods so that your tires are pointing straight ahead with your handlebars centered. Now, place a couple straight edges against the outside of the front tires. With a tape measure, measure the rear and then the front. You want the front measurement to be 1/4" smaller. Adjust the left and right tie rods in equal amounts for best results. When you reach the desired measurement, tighten up the jam nuts and your toe is set.
The angle finder shown here can be bought for $12 or less from Home Depot.
 
|
